Digital Image Steganography
There’s a neat Computerphile video discussing the topic of steganography. In the video, Mike Pound talks about a technique for steganography on digital images: least significant bit substitution (LSBS). The effectiveness of LSBS in concealing a secret image is surprising. This article puts least significant bit substitution to use in a command line tool for embedding one image within another.
A Little Background on Digital Images
You don’t need fancy image manipulation techniques to make this steganography tool work. That said, you do need to know a little bit about how the machine represents a digital image.
A digital image can contain thousands of pixels. Below is an image where the enhanced portion shows the pixels rendered as small squares.
![]()
3 to 4 channels describe each pixel in an image. There’s the classic red, green, and blue (RGB) pixel and the cyan, magenta, yellow, and black (CYMK) pixel. This articles focuses on three channel or RGB pixels.
Each channel of an RGB pixel specifies the intensity of the color using an 8-bit value. Combining the three channels, you’re able to represent 2^24 or well over 16 million different colors. Often, hexadecimal numbers describe each byte of an RGB color pixel as shown in the table below.

A digital image is a two dimensional matrix of pixel values. The steganography algorithm discussed here will encode the pixel data of one secret image in the pixel data of another cover image using a reversible process.
Least Significant Bit Substitution
LSB substitution works on the principal that the most significant bits (MSBs) of a number have a much larger impact on the numerical value than the least significant bits (LSBs). As an example, imagine you had the 16-bit value 1101010101001000 which in decimal is 54600. If you flipped the MSB, the binary number would be 0101010101001000 or 21832 decimal. That’s approximately a 60% difference from changing a single bit! Now say you went crazy and flipped the lowest 8 bits producing 1101010110110111 or 54711. Despite flipping 7 more bits, you only see an approximately 0.002% difference in the numerical value.
So how does this apply to image steganography? You can hide the MSBs of your secret image’s pixels in the LSBs of your cover image. You apply this process to each color channel in the pixel. If the cover image is a noisy one, then the change will be unnoticeable to the human eye. You simply reverse the process to recreate the secret image: make the LSBs of the merged image the MSBs of the new unmerged image with the lower bits zeroed out. You lose information in this merge/unmerge process. The loss is sometimes obvious in the unmerged image as you will see in a later example.
Here’s an example using the 4 least significant bits of each color channel.
Suppose you had a cover image pixel with the following RGB values represented in hexadecimal:
| Channel | Value |
|---|---|
| R | 0xFA |
| G | 0x1B |
| B | 0xC9 |
Your corresponding secret pixel might look something like:
| Channel | Value |
|---|---|
| R | 0x12 |
| G | 0x78 |
| B | 0xFF |
The merge operation has you take the most significant hex digit (that is, 4-bits) of the secret pixel and place them as the least significant hex digit of the cover image (highlighted below). The merged pixel would then look like:
| Channel | Value |
|---|---|
| R | 0xF1 |
| G | 0x17 |
| B | 0xCF |
To retrieve the secret pixel from a merge pixel, you take the least significant 4 bits of the merged pixel and concatenate it with zeroes on the right:
| Channel | Value |
|---|---|
| R | 0x10 |
| G | 0x70 |
| B | 0xF0 |
How many bits should you use to conceal your image? That depends on the cover and secret image. 4-bits is a rough upper limit. Using more than 4-bits often leads to artifacts in the merged image. The examples and code presented in this article use the 4 LSBs of each channel. It’s straightforward to modify the code to work with different LSB counts.
Making It Happen
The idea is to have a command line tool that could merge and unmerge two images. Program usage looks something like:
$ steganography merge cover.jpg secret.jpg out.png
...
$ steganography unmerge out.png secret.jpg
If you ignore all the argument processing and error checking code, the program
boils down to implementing two functions: Merge() and Unmerge().
Merging
Below is a snippet showing the interesting bits of the merge implementation:
static boost::gil::rgb8_pixel_t MergePixels(
    const boost::gil::rgb8_pixel_t& cover_pix,
    const boost::gil::rgb8_pixel_t& secret_pix) {
    const int kHighNibble = 0xF0;
    boost::gil::rgb8_pixel_t merged_pix(0, 0, 0);
    for (int i = 0; i < 3; ++i) {
        merged_pix[i] =
            (cover_pix[i] & kHighNibble) | ((secret_pix[i] & kHighNibble) >> 4);
    }
    return merged_pix;
}

RetCode Merge(const std::string& cover, const std::string& secret,
              const std::string& outfile) {
    ...

    /* load images into GIL image type */
    boost::gil::rgb8_image_t cover_img(ReadImage(cover, cover_img_t));
    boost::gil::rgb8_image_t secret_img(ReadImage(secret, secret_img_t));
    boost::gil::rgb8_image_t output_img = cover_img;

    ...

    /* merge the secret image's pixels into the output image */
    const boost::gil::rgb8_pixel_t kBlackPixel(0, 0, 0);
    auto secret_view = boost::gil::const_view(secret_img);
    auto output_view = boost::gil::view(output_img);
    for (int row = 0; row < output_view.height(); ++row) {
        for (int col = 0; col < output_view.width(); ++col) {
            if ((row >= secret_img.height()) || (col >= secret_img.width())) {
                output_view(col, row) =
                    MergePixels(output_view(col, row), kBlackPixel);
            } else {
                output_view(col, row) =
                    MergePixels(output_view(col, row), secret_view(col, row));
            }
        }
    }

    ...
}
You can see the Merge() function iterates over the output_view.
output_view is a mutable Boost GIL image view into a deep copy of cover_img.
For each pixel in output_view, you call MergePixels() which applies the
4-bit merge operation previously described to each of the three color channels.
Since your secret image may be smaller in dimension than your cover image,
whenever a pixel in output_view is out of range of secret_view, you merge
output_view’s pixel with a black pixel. This means that when the secret
image’s dimensions are less than that of the cover image, the image that’s later
unmerged will have a black border.
Below are three images showing the output of a merge command. From left to right you have the cover image, secret image, and merged image. You can view the actual image files here.


Unmerging
Here are the critical parts of the unmerge implementation:
static boost::gil::rgb8_pixel_t UnmergePixels(
    const boost::gil::rgb8_pixel_t& pixel) {
    const int kLowNibble = 0x0F;
    boost::gil::rgb8_pixel_t unmerged_pix(0, 0, 0);
    for (int i = 0; i < 3; ++i) {
        unmerged_pix[i] = (pixel[i] & kLowNibble) << 4;
    }
    return unmerged_pix;
}

RetCode Unmerge(const std::string& secret, const std::string& outfile) {
    ...

    /* load images into GIL image type */
    boost::gil::rgb8_image_t secret_img(ReadImage(secret, secret_img_t));
    boost::gil::rgb8_image_t output_img = secret_img;

    /* extract the hidden image into the output image */
    auto secret_view = boost::gil::const_view(secret_img);
    auto output_view = boost::gil::view(output_img);
    for (int row = 0; row < output_view.height(); ++row) {
        for (int col = 0; col < output_view.width(); ++col) {
            output_view(col, row) = UnmergePixels(secret_view(col, row));
        }
    }

    ...
}
Not too much to harp on here. This is the inverse of the Merge() function. The
key is that you know how many bits formed the secret during merging. Now you can
pop the proper bits from the LSBs of the merged image to the MSBs of the output
image.
Below is the original secret image on the left and the unmerged image on the right. Notice the loss in quality in the unmerged image. This happens because you lost the 4 LSBs of each pixels’ color channels when performing the merge operation.
A Note on Image Formats
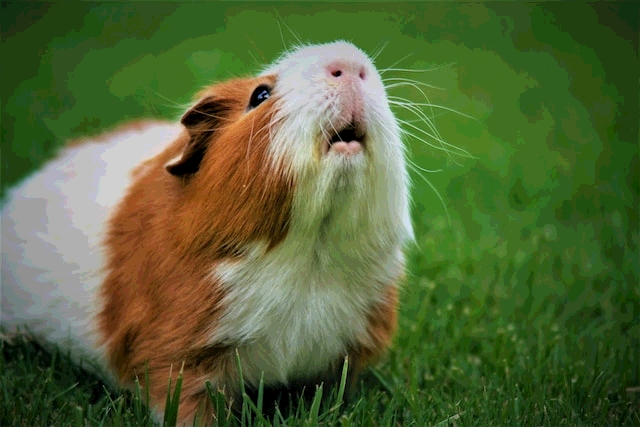
There’s a fun file format related bug worth discussing. It turns out some image formats are lossy. What this means is that when you format your image data using one of these lossy formats, you lose or alter pixel data. This is bad news for this naive image steganography tool. Just take a look at what happens to the poor guinea pig after a merge to JPEG:

The steganography tool presented here supports just two image formats: JPEG and PNG. JPEG is a lossy format. PNG is a lossless format. The easy solution is to require that the output of a merge command always be a PNG. This implies the input to an unmerge command is always a PNG. The output of an unmerge command can be either format.
Conclusion
The least significant bit substitution method proved simple to implement and doesn’t disappoint in its effectiveness in secretly embedding one image within another. Interested in a more serious steganography tool? Highly recommend checking out a free and open source tool such as steghide.
Note, this project has since been rewritten in Rust and renamed to steg. The
complete project source is available on GitHub under steg. The Rust version
of the project includes more testing, support for additional image formats, and
the ability to chose the number of bits to use for the merge/unmerge operation.