Keyball44 Viz
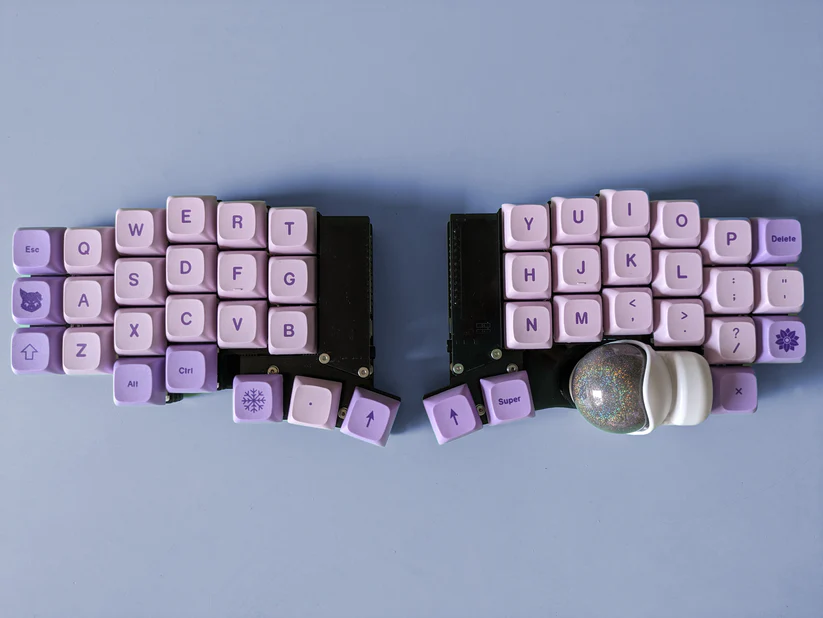
The keyball44 is a 40% split keyboard with a built-in trackball. It
supports custom keymaps through QMK firmware. As a first step to programming the
board, you modify a keymap.c file. It’s easy to make mistakes when editing the
keymap.c file, especially when dealing with multiple layers and complex
keycodes. That’s where keyball44-viz comes in. keyball44-viz is a
command-line tool written in Rust that parses a keymap.c file and generates an
SVG visualization of the keyboard layout.
Taking a Look at keymap.c
The snippet below defines six layers for the keyboard, including a base layer,
symbol layer, number layer, navigation layer, function layer, and trackball
layer. Each layer gets defined using the LAYOUT_universal macro, which maps
key positions to keycodes.
const uint16_t PROGMEM keymaps[][MATRIX_ROWS][MATRIX_COLS] = {
    // Base Layer
  [0] = LAYOUT_universal(
    KC_TAB   , KC_Q     , KC_W     , KC_E     , KC_R     , KC_T     ,                                        KC_Y     , KC_U     , KC_I     , KC_O     , KC_P     , KC_BSPC   ,
    KC_LCTL  , KC_A     , KC_S     , KC_D     , KC_F     , KC_G     ,                                        KC_H     , KC_J     , KC_K   , LT(5, KC_L), KC_SCLN  , KC_ENT  ,
    KC_LSFT  , KC_Z     , KC_X     , KC_C     , KC_V     , KC_B     ,                                        KC_N     , KC_M     , KC_COMM  , KC_DOT   , KC_SLSH  , KC_RSFT  ,
                  MO(4),KC_LALT,KC_LGUI     ,MO(3),KC_SPC,                                        MO(1),MO(2), KC_RALT,     _______  , MO(5)
  ),

    // Symbol Layer
  [1] = LAYOUT_universal(
    _______ ,  KC_GRV   ,S(KC_BSLS), _______  , KC_QUOT  ,S(KC_QUOT),                                        _______  ,S(KC_LBRC),S(KC_RBRC), KC_LBRC  , KC_RBRC  , _______  ,
    _______ , S(KC_1)   ,  S(KC_2) , S(KC_3)  , S(KC_4)  , S(KC_5)  ,                                         S(KC_6) , S(KC_7)  , S(KC_8)  , S(KC_9)  , S(KC_0)  , _______  ,
    _______ ,  _______  , _______  , _______  , _______  , _______  ,                                         _______ , _______  , _______  , _______  , KC_BSLS  , _______  ,
                _______,_______,_______     ,_______,_______,                                     _______,_______,_______,   _______  , _______
  ),

    // Number Layer
  [2] = LAYOUT_universal(
    _______ , S(KC_GRV) , _______  , _______  , _______  , _______  ,                                         _______ , KC_MINUS ,S(KC_MINUS), KC_EQL  , S(KC_EQL), _______  ,
    _______ , KC_1      , KC_2     , KC_3     , KC_4     , KC_5     ,                                         KC_6    , KC_7     , KC_8      , KC_9    , KC_0     , _______  ,
    _______ , _______   , _______  , _______  , _______  , _______  ,                                        _______  ,_______   , _______   ,_______  ,_______   ,_______   ,
                _______,_______,_______     ,_______,_______,                                     _______,_______,_______,   _______  , _______
  ),

    // Navigation Layer
  [3] = LAYOUT_universal(
    KC_ESC  , _______   , _______  , _______  , _______  , _______  ,                                        _______  , KC_PGUP  , KC_PGDN   , KC_HOME , KC_END   , KC_DEL   ,
    _______ , _______   , _______  , _______  , _______  , _______  ,                                        _______  , KC_LEFT  , KC_DOWN   , KC_UP   , KC_RIGHT , S(KC_INSERT),
    _______ , _______   , _______  , _______  , _______  , _______  ,                                        _______  ,_______   , _______   ,_______  ,_______   ,_______   ,
                _______,_______,_______     ,_______,_______,                                     _______,_______,_______,   _______  , _______
  ),

    // Function Layer
  [4] = LAYOUT_universal(
    _______ , KC_F11    , KC_F12   , _______  , _______  , _______  ,                                        _______  , _______  , KC_PSCR   , KC_SCRL , KC_PAUSE , _______  ,
    _______ , KC_F1     , KC_F2    , KC_F3    , KC_F4    , KC_F5    ,                                        KC_F6    , KC_F7    , KC_F8     , KC_F9   , KC_F10   , _______  ,
    _______ , KC_CAPS   , KC_NUM   , _______  , _______  , _______  ,                                        _______  , _______  , _______   , _______ , _______  , _______  ,
                _______,_______,_______     ,_______,_______,                                     _______,_______,_______,   _______  , _______
  ),

    // Trackball Layer
  [5] = LAYOUT_universal(

    _______  , AML_TO   , AML_I50  , AML_D50  , _______  , _______  ,                                        _______  , _______  , _______  , _______ , _______ , _______  ,
    _______  , _______  , _______  , _______  , _______  , SCRL_DVI ,                                        _______  , KC_BTN1  , KC_BTN2  , _______ , _______  , _______  ,
    _______ , _______  , _______  , _______  , _______  , SCRL_DVD ,                                        CPI_D1K  , CPI_D100 , CPI_I100 , CPI_I1K  , _______  , KBC_SAVE ,
                  QK_BOOT  , KBC_RST  , _______  ,        _______  , _______  ,                   _______  , _______  , _______       , KBC_RST  , QK_BOOT
  ),
};
In the example, the keymaps at each layer contain whitespace meant to help developers visualize the layout. Not all keymaps you come across online will look this neat. Additionally, small screens/line wrapping can still make a well organized keymap file difficult to read. A basic visual representation can help you validate the layout before putting in the effort to build and flash the firmware.
Visualizing the Keymap

This image is a visualization of the keymap previously defined. A separate keyboard diagram matching the keyball44 layout gets drawn for each layer. Keys get labeled according to their assigned keycodes. Each layer has a distinct color scheme to differentiate them.
You can move keys around in your keymap.c file and regenerate the SVG to see
how the changes affect the layout. Just pass keyball44-viz your keymap.c
file for processing. The whole process takes just a few seconds, making it easy
to iterate on your design.
Usage
You can build keyball44-viz from source using Cargo. Alternatively, you
can download precompiled binaries for both Windows and Linux x86_64 from the
releases page on GitHub.
Usage is straightforward. Run the tool from the command line providing the path
to your keymap.c file:
keyball44-viz path/to/keymap.cThe tool will output a keymap.svg file in the current directory. You can view
the SVG in a browser. For a full list of options, run keyball44-viz --help.