Real-time Linux App Development

If you’re an embedded systems programmer, you have likely touched on the topic of real-time operating systems (RTOS). There are plenty of commercial RTOSes available on the market: VxWorks, Integrity, DeOS, Helix, the list goes on. As a hobbyist, you may not have thousands of dollars to spend paying for commercial licenses. Real-time Linux can fill the void by providing a path to a soft real-time system.

This post takes a tour through the advice given in John Ogness’s 2020 presentation: “A Checklist for Writing Linux Real-Time Applications”. You’ll explore how to optimize a Linux system and application for real-time execution using John’s real-time Linux development checklist.

Who Needs a Real-time System

Setting up and tuning a Linux real-time system is a time consuming task. Before diving in, consider what an RTOS provides:

  1. Low Latency: Latency is a measure of the delay from when you tell the system to perform an action until the system actually starts executing that action.
  2. Determinism: An RTOS provides deterministic scheduling policies. You can orchestrate software components such that they run within specific time frames.

If your application requires (1) and (2), then it’s a worthy endeavor to setup a real-time system.

Now, do you need a soft or a hard real-time system? What’s the difference? It all relates to the application’s deadlines.
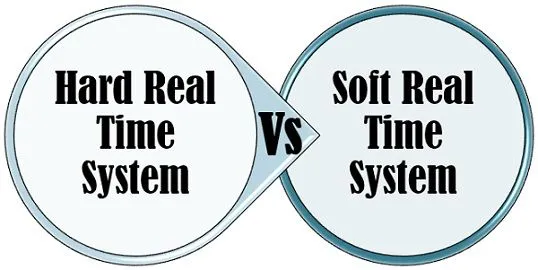
Soft vs Hard RT

In hard real-time systems, the OS must meet task deadlines otherwise the system may fail or fault. In soft real-time systems, the system is resilient to task overruns and won’t fail if a deadline isn’t met.

Many control systems require hard real-time execution. For example, a flight control application which continuously misses its deadlines can accumulate enough error to cause loss of control. In contrast, some applications need only soft real-time. Take for example a weather station application sampling an array of unsynchronized sensors at a steady interval. Missing a deadline in this situation isn’t catastrophic as long as the sample time is “close enough” to the other sensor samples. Again, you have to look at your application requirements and decide which real-time variant makes sense.

The aim of this post is to provide tips for the setup of a near optimal soft real-time Linux system. Achieving hard real-time isn’t possible given that the Linux kernel isn’t designed to guarantee deadlines. Benchmarking and performance monitoring are critical in verifying timing requirements on RT Linux system.

Real-time Kernel Patches

The first step to setting up a RT Linux system is to make the kernel fully preemptible via the real-time kernel patches. You can apply the PREEMPT_RT patches to your kernel using the steps listed below:

  1. Make note of your kernel’s X.Y.Z version number. Typically, the git branch name will include the version number.
  2. Go to kernel.org and download the *.gz containing the patch files for your particular kernel version.
  3. Apply the patches:
cd linux/ gzip -cd
/path/to/patch-4.19.94-rt39.patch.gz | patch -p1 --verbose
  1. Verify there are no *.rej files in your Linux source tree.

Kernel Configuration

Getting the right kernel configuration is critical in reducing latency. Below is a table of the configurations you will want to enable/disable. See the config option footnotes for more details.

ConfigON/OFFLocation
CONFIG_PREEMPT_RT_FULLONGeneral Setup -> Preemption Model -> Fully Preemptible Kernel (RT)
CONFIG_SOFTLOCKUP_DETECTOROFFKernel hacking -> Debug Lockups and Hangs -> Detect Soft Lockups
CONFIG_DETECT_HUNG_TASKOFFKernel hacking -> Debug Lockups and Hangs -> Detect Hung Tasks
HZ_1000ONKernel Features -> Timer frequency -> 1000 Hz
CONFIG_NO_HZ_FULLONGeneral Setup -> Timers subsystem -> Timer tick handling -> Full dynticks system (tickless)
CONFIG_CPU_FREQ_GOV_PERFORMANCEONCPU Power Management -> CPU Frequency Scaling -> ‘performance’ governor
CONFIG_CPU_FREQ_GOV_POWERSAVEOFFCPU Power Management -> CPU Frequency Scaling -> ‘powersave’ governor
CONFIG_CPU_FREQ_GOV_ONDEMANDOFFCPU Power Management -> CPU Frequency Scaling -> ‘ondemand’ cpufreq governor
CONFIG_CPU_FREQ_GOV_CONSERVATIVEOFFCPU Power Management -> CPU Frequency Scaling -> ‘conservative’ cpufreq governor
CONFIG_CPU_FREQ_GOV_SCHEDUTILOFFCPU Power Management -> CPU Frequency Scaling -> ‘schedutil’ cpufreq policy governor
CONFIG_DEBUGOFFKernel hacking -> *

Scheduling Policies

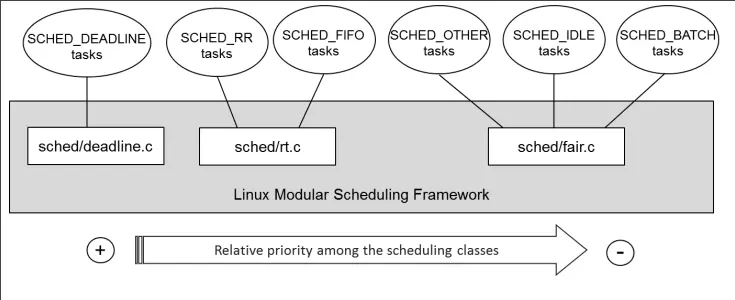
Linux Scheduling Policies

Linux provides three real-time scheduling policies.

  • SCHED_FIFO: A scheduling policy based on static priorities (1-99). A task can only lose the CPU if a higher priority task comes or via hardware interrupts.
  • SCHED_RR: The same as SCHED_FIFO with the added twist that if two tasks have the same priority, then they will execute in round robin fashion using a configurable timeslice.
  • SCHED_DEADLINE: Each task gets a budget Q (AKA runtime) and a period P telling the kernel that the task requires Q time units every P time units on any processor.

RT scheduling policies only apply to RT tasks! All other tasks use SCHED_OTHER and have their CPU time controlled via nice values. You set an RT the scheduling policy in one of two ways: programmatically or using the chrt utility.

If you prefer setting the scheduling policy from your boot or run scripts, chrt is the way to go:

Set Policy:
    chrt [opts] <policy> <prio> <pid>
    chrt [opts] <policy> <prio> cmd [<arg> ...]
Scheduling Policies
    -f, --fifo      set policy to SCHED_FIFO
    -r, --rr        set policy to SCHED_RR

You can also code the scheduling policy and priority directly:

#include <sched.h>

struct sched_param param;

param.sched_priority = 80;
sched_setscheduler(0, SCHED_FIFO, &param);

SCHED_FIFO is the most common and easy to reason about policy. You’ll want to be careful with any of the priority based policies to never set a task’s priority to 99. You don’t want your application taking time away from critical kernel threads.

By default the Linux kernel limits the amount of time all real-time tasks get on the CPU. If the total CPU time of all RT tasks exceeds 95% of a second, then for the remaining 5% of that second no RT task runs! This is equivalent to bad priority inversion and breaks a real-time system. You can disable this policy by writing -1 to /proc/sys/kernel/sched_rt_runtime_us:

echo "-1" > /proc/sys/kernel/sched_rt_runtime_us

This setting isn’t a kernel configuration option. You have to repeat the command every time you reboot or write a boot script to clear it for you!

Isolating CPUs

On multicore systems, you can improve determinism by pinning tasks to specific cores. There’s a couple ways to do this:

  • Explicitly set CPU affinities via the taskset utility or programmatically.
  • Edit kernel boot parameters to set default CPU affinity masks for all tasks (including kernel tasks).
  • Set CPU affinity masks for routing HW interrupt handling.

Setting CPU Affinities

A task’s CPU affinity is a bitmask specifying what CPU cores the scheduler can put the task on. You can control CPU affinity down to the thread level. You can use the taskset utility to set affinities from your scripts:

taskset [options] mask command [arg]...
taskset [options] -p [mask] pid

You can also set affinities programmatically:

/* Need to define _GNU_SOURCE since sched_setaffinity() is not part of POSIX but
implemented in glibc. */
#define _GNU_SOURCE
#include <sched.h>

cpu_set_t set;

CPU_ZERO(&set);
CPU_SET(0, &set);
CPU_SET(1, &set);
sched_setaffinity(pid, CPU_SETSIZE, &set);

CPU Isolation via Kernel Boot Parameters

The kernel provides two boot parameters to regulate CPU utilization:

  1. maxcpus=n: Limits the kernel to bring up N CPUs.
  2. isolcpus=cpulist: Specifies the CPUs to isolate from disturbances.

maxcpus tells the kernel to at most use N CPUs. As an example, suppose you have a 4 core system. With maxcpus=2, Linux would take two CPUs for itself and leave the other two completely alone. This feature is useful when one wants to run bare metal applications on the “reserved” CPUs that can communicate with the processes running on the cores used by Linux.

isolcpus tells the kernel to be aware of the CPUs you specify in the argument cpulist, but don’t schedule any tasks including kernel tasks on those CPUs. You can later tell Linux to schedule your RT tasks on those isolated CPUs.

Hardware Interrupt Affinities

When a hardware interrupt enters the system, any CPU may service that interrupt. This can cause latency increases if the CPU your RT task is running on services the interrupt. So how do you re-route interrupts to CPUs not running your RT tasks?

As a first step, set the default CPU affinity for HW interrupt handling on interrupt handler registration. You can view and configure these settings via /proc/irq/default_smp_affinity.

For registered interrupts, you can update their affinities via /proc/irq/<irq-number>/smp_affinity. Be aware, some hardware can’t perform this IRQ re-routing. After making a change in smp_affinity, always check that the setting stuck by querying /proc/irq/<irq-number>/effective_affinity!

Beware of Caching

When partitioning your tasks among the different cores, take into consideration caches and their layout. Two or more cores may share a number of caches. You may experience adverse side effects on the RT side as the non-RT processes invalidate portions of the cache! You want to look at the reference manual for your CPU to see the cache layout. Afterward, create a core-to-task assignment that reduces cache contention.

Memory Management
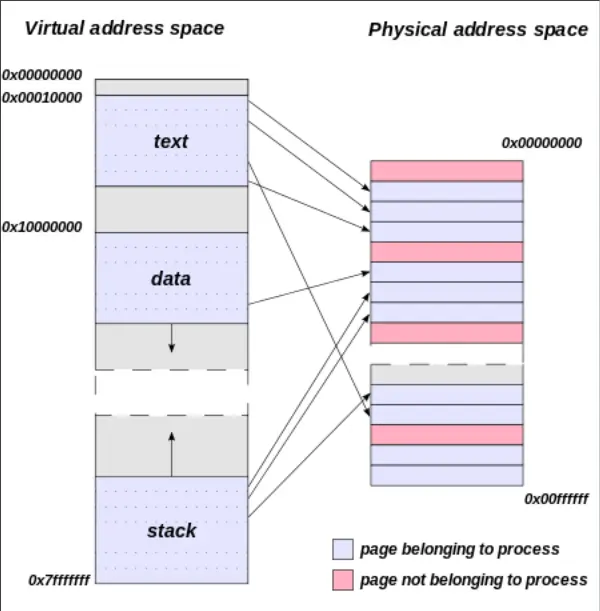
Simplistic Virtual Address Space

How an RT application manages memory deserves some attention. Going back to college and your OS course, you may remember that processes work with memory in chunks called pages. When a process requests memory or accesses a page not currently in memory, a page fault occurs. The OS’s page fault handler services the fault by loading the missing page to memory. This is an expensive operation and one you want to avoid in a RT application.

What are all the sources of a page fault your applications may encounter? There are many memory accesses that may trigger page faults:

  • Text Segment
  • Initialized Data Segment
  • Uninitialized Data Segment
  • Stack
  • Heap

There’s a couple of tricks you can employ to avoid page faults:

  1. Tuning glibc’s malloc
  2. Locking Allocated Pages
  3. Prefaulting

The following sections look at each strategy in more detail.

Tuning glibc’s malloc

glibc’s malloc can request memory in more than one way. Under the hood, malloc will by default make mmap calls to the kernel to get memory which is not part of the processes’ heap. When this mmap’ed memory gets released, it’s not immediately available for reuse by the process.

Luckily, malloc is configurable via mallopt. You can disable memory allocation via mmap by clearing the M_MMAP_MAX option:

#include <malloc.h>

mallopt(M_MMAP_MAX, 0);

This setting will tell malloc to never call mmap and instead always allocate memory using the processes’ heap. The memory in this heap area will be available for reuse even after a call to free.

There’s one more glibc malloc behavior you want to disable and that’s heap trimming. malloc will look at the heap and trim large contiguous blocks of free memory. You don’t want to be losing page sized chunks of memory you previously payed the page fault tax to access. To disable this feature:

#include <malloc.h>

mallopt(M_TRIM_THRESHOLD, -1);

Locking Allocated Pages

It’s important that you lock all current and future pages of your processes’ virtual address space to RAM. you can tell the kernel to do this using the mlockall sys call:

#include <sys/mman.h>

mlockall(MCL_CURRENT | MCL_FUTURE);

Prefaulting

To avoid page faults during runtime, you’ll want to take the page faulting “hit” early on at application startup. To do that you prefault the heap. To do this correctly, you’ll need to calculate your application’s worst case space usage. Here’s how you prefault the heap:

#include <stdlib.h>
#include <unistd.h>

void prefault_heap(int size)
{
    char *dummy;
    int i;

    dummy = malloc(size);
    if (!dummy)
        return;

    for (i = 0; i < size; i += sysconf(_SC_PAGESIZE))
        dummy[i] = 1;

    free(dummy);
}

Notice the write to each page. The write guarantees that a page fault gets triggered and that the page is actually loaded into RAM. The combination of malloc tuning and memory page locking ensures all the heap memory your application needs will be sitting in RAM.

But wait, there’s more! You should similarly prefault the stack. Here’s a routine to do just that:

#include <unistd.h>

#define MAX_SAFE_STACK (512 * 1024)

void prefault_stack(void)
{
    unsigned char dummy[MAX_SAFE_STACK];
    int i;

    for (i = 0; i < size; i += sysconf(_SC_PAGESIZE))
        dummy[i] = 1;
}

This function creates a massive 512kb stack frame and then touches each page that forms that frame once. When the function returns, the pages that form the now 512kb stack space will remain since you previously locked down memory with mlockall.

Locking and Synchronization

Locks are important in any application that needs mutual exclusion. When in need of mutual exclusion in an RT Linux app, always go with pthread_mutex! What about semaphores? Semaphores are a no go since they don’t have a notion of ownership. In contrast, the kernel knows when a lower priority task owns/holds a pthread_mutex. The kernel temporarily boosts the task’s priority so that it runs and frees the lock allowing a higher priority task to acquire the lock. This is what’s known as priority boosting or inheritance and it’s how Linux resolves the priority inversion problem. The image below illustrates this concept. You can imagine Resource A is a lock under contention.
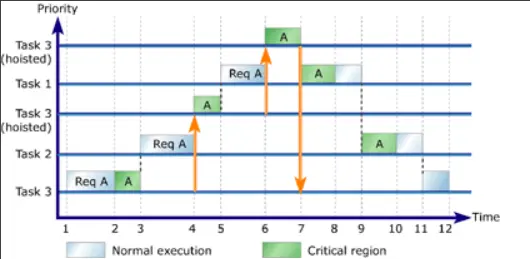
Priority Inheritance

To get pthread_mutex to behave as described, you have to tell the kernel to employ priority inheritance. Set the PTHREAD_PRIO_INHERIT option via the pthread_mutexattr_setprotocol system call. Here’s an example of how to setup and use your mutex:

#include <pthread.h>

pthread_mutex_t lock;
pthread_mutexattr_t mattr;

pthread_mutexattr_init(&mattr);
pthread_mutexattr_setprotocol(&mattr, PTHREAD_PRIO_INHERIT);
pthread_mutex_init(&lock, &mattr);

pthread_mutex_lock(&lock);
/* critical section */
pthread_mutex_unlock(&lock);

pthread_mutex_destroy(&lock);

Signaling

When it comes to signaling within or among RT applications, there are two approaches to consider:

  • Standard Signals: These are the signals in the SIG* family that get caught by an application using sigaction.
  • pthread_cond Signals: These are condition objects typically associated with a pthread_mutex that synchronize notification between threads/processes.

Avoid standard signals in an RT application. Why? The context when a signal handler executes is hard or near impossible to predict. Are you holding a lock? Are you priority boosted? Worse yet, there are differences in behavior among the different glibc implementations. Avoid signals in your RT application.

pthread_cond condition variables are safe to use in your RT app. The only caveat is that you make sure to notify waiting threads/processes before releasing a lock! As an example of why it’s important to notify waiters before releasing locks, consider this scenario on a uniprocessor system:

  1. Task 1 priority 50 gets scheduled and acquires a shared lock.
  2. Task 2 priority 60 gets scheduled (Task 1 gets descheduled due to lower priority).
  3. Task 2 requests the lock.
  4. Kernel boosts Task 1 priority to 60 and schedules it.
  5. Task 1 completes its critical section and releases the lock.
  6. Kernel deboosts Task 1 back to priority 50 and schedules Task 2.
  7. Task 2 acquires the lock.
  8. Task 2 waits forever on a signal that will never come from Task 1!

To avoid this scenario, always notify receivers before releasing a lock when working with POSIX condition variables. Here’s a code snippet illustrating proper signaling:

#include <pthread.h>

pthread_mutex_t lock;
pthread_cond_t cond;

/* receiver side */
pthread_mutex_lock(&lock);
pthread_cond_wait(&cond, &lock);
/* We have been signaled. */
pthread_mutex_unlock(&lock);

/* sender side */
pthread_mutex_lock(&lock);
/* critical section */
pthread_cond_broadcast(&cond);
pthread_mutex_unlock(&lock);

Clocks and Cyclic Tasks

When it comes to clocks in an RT app, you want to stick with the POSIX functions for clock specification (that is, the clock_* family of functions). There are a number of clock types:

  • CLOCK_REALTIME: System-wide real-time clock.
  • CLOCK_MONOTONIC: Clock representing monotonic time since some unspecified starting point.
  • CLOCK_PROCESS_CPUTIME_ID: High-resolution per-process timer from the CPU.
  • CLOCK_THREAD_CPUTIME_ID: Thread-specific CPU-time clock.

CLOCK_MONOTONIC is what you want to use in your app. The monotonic clock always moves forward and respects the human definition for seconds. There’s no adjustment due to NTP, accounting for daylight savings, etc. It provides a constant tick from some starting point.

When working with time, you want to use absolute time values. Calculating relative times is risky because the execution itself takes time. It’s best to compute when you next want to wakeup and then wakeup at that time. Here’s a short snippet that shows a cyclical task using CLOCK_MONOTONIC and absolute time calculations to set its next wakeup.

#include <time.h>

#define CYCLE_TIME_NS (100 * 1000 * 1000)
#define NSEC_PER_SEC (1000 * 1000 * 1000)

static void norm_ts(struct timespec *tv)
{
    while (tv->tv_nsec >= NSEC_PER_SEC) {
        tv->tv_sec++;
        tv->tv_nsec -= NSEC_PER_SEC;
    }
}

void cyclic_task_main(void)
{
    struct timespec tv;

    clock_gettime(CLOCK_MONOTONIC, &tv);

    while (1) {
        /* do stuff */

        /* wait for the next cycle */
        tv.tv_nsec += CYCLE_TIME_NS;
        norm_ts(&tv);
        clock_nanosleep(CLOCK_MONOTONIC, TIMER_ABSTIME, &tv, NULL);
    }
}

Evaluating a Real-time System

Cyclictest is one of the best tools to use in evaluating your real-time system. What’s Cyclictest?

Cyclictest accurately and repeatedly measures the difference between a thread’s intended wake-up time and the time at which it actually wakes up in order to provide statistics about the system’s latencies.

Here are a couple key points to keep in mind when working with Cyclictest:

  • Test parameters matter. The parameters you pass to Cyclictest determine the latencies measured by the test. Read the manpage, checkout examples, and make sure you understand what latencies get measured.
  • Reduce the “observer effect” as much as you can. The execution of Cyclictest itself can affect the latencies measured. There’s ways to combat this issue such as isolating the Cyclictest main thread to a unused CPU. See the FAQ for more details.
  • System load matters. You are going to want to test with a representative system load. Representative in this case means simulating CPU use, memory use, I/O, network use, etc. There are tools like hackbench and existing strategies that can assist you in crafting realistic loads.

A resource worth mentioning is the OSADL website.

OSADL (Open Source Automation Development Lab) uses Cyclictest to continuously monitor the latencies of several systems.

On the OSADL site, they share a script that you can run on your system to generate a histogram plot of latencies as shown below.
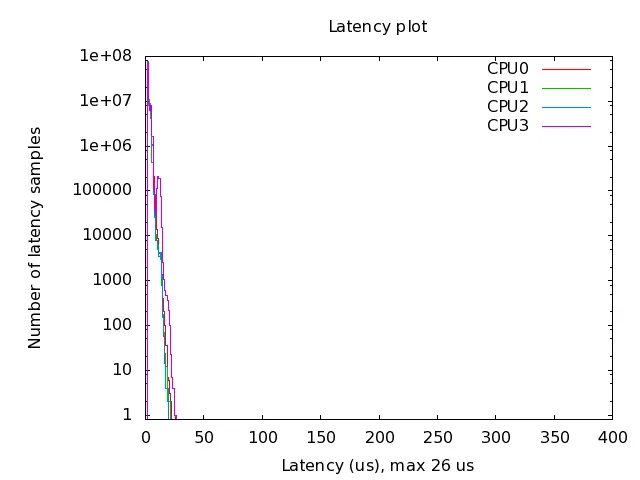
Latency Histogram

If you choose to use the OSADL script, make sure you update Cyclictest parameters so that you are testing for the right latencies on your system! OSADL latency plots include the parameters used to run Cyclictest on the platform under test. You can take those parameters and try them out on your system to see how one platform compares to another.

The value of interest that Cyclictest outputs is the maximum worst case latency detected. When interpreting this value, keep in mind that this is the worst latency that was measured. The measured maximum doesn’t necessarily equal the system’s worst case latency!

Conclusion

In the world of embedded development, some applications have tight timing and scheduling requirements that necessitate the use of a real-time system. Linux provides a path to a soft real-time system via its PREEMPT_RT patches which make the kernel fully preemptible. In the quest to reduce latencies and improve determinism, one must configure the kernel and their application to avoid pitfalls which could lead to system failure. Luckily, there are plenty of techniques, tools, and resources to help you standup a RT Linux system that meets your needs.

read more →

Building and Deploying a Real-time Kernel to the Beaglebone Black

Not long ago, a project that involved a low latency app running on a Beaglebone Black (BBB) came up at work. The minimal latency requirement drove the decision to run the BBB with a PREEMPT_RT patched kernel. Luckily, Robert C. Nelson, one of the Beaglebone Black maintainers, maintains a set of scripts for building a kernel specifically for the BBB. Among the many kernel versions offered are variants that have had the PREEMPT_RT patches already applied! The goal is simple: flash the BBB with the latest console image rootfs and Linux kernel (RT patches included).

Prepping the SD Card

First things first, flash the latest BBB Debian image onto an SD card. The latest Debian Console Image is the best choice unless there is a solid reason to use the much larger IoT image:

wget https://debian.beagleboard.org/images/bone-debian-10.3-console-armhf-2020-04-06-1gb.img.xz

Unarchive the *.img file:

xz -d *.xz

Finally, write the *.img to the SD card. Before running the command below, triple check that you have the right device name for the SD card! Run lsblk to discover the SD card devname or check the dmesg logs.

sudo dd if=*.img of=/dev/sdb

Building the Kernel Installer Files

As mentioned previously, Robert’s ti-linux-kernel-dev project lets one build a kernel with the RT patches applied. The output of a build is a collection of *.deb files that you transfer to the BBB. You install the packages on the BBB using dpkg.

Robert’s scripts require that the host system have a number of libraries and utilities installed in order for the kernel build to succeed. To ease the process, I created the bbb_kernel_builder project that launches a docker container which runs the build scripts on your behalf. The docker container will prompt you to configure the kernel, but, beyond that, the process is hands off. A successful container run copies *.deb kernel packages to the host PC (see the README for details).

A future post will discuss the details of configuring a kernel for real-time. For now, watch John Ogness’s “A Checklist for Writing Real-Time Linux Applications” and skip to the section on kernel configuration:

{{< youtube NrjXEaTSyrw >}}

Installing the Kernel On the BBB

Now, all that remains is installing the kernel on the BBB.

First, mount the rootfs previously created onto the host filesystem. Following the previous example, the rootfs on the SD card has the label /dev/sdb1. Your SD card may have a different name, use lsblk to find the right device.

sudo mount /dev/sdb1 /mnt/sd

Copy the *.deb files to some known location on the rootfs. For example, the root user’s home directory: /root. If you used the bbb_kernel_builder project to build your kernel, the debs will be under bbb_kernel_builder/bin.

sudo cp bbb_kernel_builder/bin/*.deb /mnt/sd/root

Unmount the SD card.

sudo umount /mnt/sd

Boot the BBB off the SD card and login as root. Install the kernel.

dpkg -i /root/*.deb

Reboot the BBB off the SD card. Verify your kernel is live by running uname -a. You should see output similar to that shown below. Note the PREEMPT_RT bit indicates that you have a fully preemptible kernel!

Linux beaglebone 5.10.162-ti-rt-r59 #1xross SMP PREEMPT_RT ...

Conclusion

Depending on the requirements of the application you are developing, you may find a real-time kernel is necessary. Linux provides soft real-time capabilities in the form of the PREEMPT_RT kernel patches. Building and deploying a kernel for the BBB from scratch is a nontrivial task. Luckily, BBB maintainers have made it easier by providing PREEMPT_RT patched kernel sources and scripts for building custom kernel install files. Do keep in mind that there’s more to setting up an RT Linux application than just installing a patched kernel. A follow-on article will dive into the details of how to configure the system and application for ideal RT performance.

read more →

Cross-device Password Mgmt Using Pass

Who hasn’t been guilty of reusing passwords across multiple online services. If you make a habit out of reusing passwords, it’s pretty easy to get pwned not for just one service but many all at once. The modern day solution is to use a password manager. This article walks you through setting up password management across Linux and Android devices.

Finding a Password Manager

There’s no shortage of password managers to choose from. Your choice of password manager is dependent on what devices you use and what your typical workflow looks like. Here’s what a set of basic password manager requirements looks like:

  1. Android support
  2. Linux support
  3. A command line interface

pass is one of the best open source options around. The pass homepage has a nice summary of the tool:

Password management should be simple and follow Unix philosophy. With pass, each password lives inside of a gpg encrypted file whose filename is the title of the website or resource that requires the password. These encrypted files may be organized into meaningful folder hierarchies, copied from computer to computer, and, in general, manipulated using standard command line file management utilities.

pass checks requirements 2-3 off. The actively maintained Password Store app on Android meets requirement 1 (more on that later).

Install pass using your Linux distribution’s package manager before moving on to the next section.

Setting Up a GPG Key

To work with pass, you need a gpg-id. If you need to make an ID, the GNU Privacy Guard Manual has you covered. Here’s a quick summary of how to generate a 4096 bit RSA key:

  1. Open a terminal.
  2. Enter gpg --full-generate-key
  3. Press Enter to select the default RSA and RSA option.
  4. At the prompt, specify a key size of 4096 and press Enter.
  5. Press Enter to select the default of no expiration date.
  6. Follow the prompts to enter your ID info.
  7. Enter a secure password.
  8. Enter gpg --list-keys to view your newly minted key.
> gpg --list-keys
[keyboxd]
---------
pub   rsa4096 2022-01-04 [SC]
      EA76D0964E4D26EEB24CCBC57714EAED772DC391
uid           [ultimate] Ivan Eduardo Guerra <ivan.eduardo.guerra@gmail.com>
sub   rsa4096 2022-01-04 [E]

Password Database Creation and Git Support

To initialize pass, call its init function with your public GPG key as the argument. You can find your key by running gpg --list-keys. In the previous screenshot, the public key is EBAA65BDAF7BF5D770070F013BE52220A00B08A9. Here’s how you initialize the pass database:

pass init EBAA65BDAF7BF5D770070F013BE52220A00B08A9

pass init creates a .password-store directory in your home directory. You can move this directory wherever you like. Just remember to tell pass about it by setting the PASSWORD_STORE_DIR environment variable.

One of the nice features of pass is its git integration. You can perform git operations on the password store database using the syntax

pass git GIT_ARGS...

Git operations apply to the .password-store database directory previously created on init. To track changes to the database with git:

pass git init

pass will automatically create commits whenever you add, edit, remove, etc. passwords via the pass CLI!

Password Generation and Storage

pass has password generation built-in. To generate and store passwords, the syntax is:

pass generate [--no-symbols, -n] [--clip, -c] [--force, -f] PASS_NAME PASS_LEN

Some websites only accept alphanumeric passwords in which case the --no-symbols option comes in handy. The --clip option is useful if you want to generate and simultaneously copy to the clipboard the new password. Password insertion, removal, and editing are all supported. See the manpage for the details.

pass gives a lot of flexibility in how you organize your passwords. For example, you might generate these passwords:

pass generate games/runescape 20
pass generate services/facebook 20
pass generate services/linkedin 20
pass generate services/github 20
pass generate services/gitlab 20
pass generate email/ivan.eduardo.guerra@gmail.com 20

Running pass at the terminal (or pass ls), You’d see the following printout:

Password Store
|-- email
|   `-- ivan.eduardo.guerra@gmail.com
|-- games
|   `-- runescape
`-- services
    |-- facebook
    |-- github
    |-- gitlab
    `-- linkedin

You get full control over how you organize your passwords! When it comes time to login to one of the services, just show the password with the command

pass [show] PASS_NAME

Better yet, let pass copy the password to your clipboard:

pass -c PASS_NAME

Beyond Passwords

If you take a look at the .password-store directory, you’ll notice that there is a *.gpg per password. That is, pass is encrypting a flat text file that when decrypted contains a password on the first line. The developer of pass took advantage of this fact and made it easy to store arbitrary info along with a password. This is the “multiline” feature of pass. For example, if you wanted to edit games/runescape to add additional info:

pass edit games/runescape

pass will bring up the editor pointed to by your EDITOR environment variable. From there, you can put your password on the first line and all other secrets (for example, username and recovery questions/answers) on subsequent lines. Note, you can also use the --multiline option with the insert command to store secret data:

pass insert --multiline misc/super_secret

Remotely Hosting the Password Database

Of course, before your can access your password database remotely you need to host it somewhere. Some people host their own git instances others may use online hosting services like GitHub. You might ask, is your password database safe if it’s at all reachable from the Internet? To quote the Password Store wiki:

Yes and no. The password themselves are safe, since they are stored in an encrypted fashion. They are secure as long as your GPG key’s secret part is safe. However, the repo leaks the names of the entries: a password named web/site.com will be stored in the file web/site.com.gpg. As a consequence, anyone who can see your public repo can see the name of your passwords, which is not so great for privacy: if a file is named web/pornhub.com.gpg, this might give a hint about your browsing habits. Moreover, the size of the files might also gives a clue about which accounts might have small passwords. If a file is very small, chances are that your password is small too. An attacker could use this information to select which account of yours is most likely to have a weak password.

If you want to sync passwords between your phone and PC, you need to host the password database on some online service. It’s up to you to decide if the convenience of password syncing beats out the danger of exposing your password names to an attacker.

Whether you’re self hosting a git instance or using a service like GitHub, the pass commands for syncing a remote database with a local one remain the same:

pass git remote add origin GIT_URL
pass git push origin master

These two commands sync your remote instance with your local password database.

Android Support

Password Store

Android support was one of the original requirements. pass is just a Unix password management command line utility. Luckily, the Password Store Android app exists. With Password Store, you can sync with a remote server hosting the .password-store database. Working in conjunction with Password Store is the OpenKeychain app with which you can store your GPG secret key on mobile.

Transferring your private key to OpenKeychain is the first step. OpenKeychain recommends you use the following commands:

export GPG_TTY=$(tty)

# generate a strong random password
gpg --armor --gen-random 1 20

# encrypt key, use password above when asked
gpg --armor --export-secret-keys YOUREMAILADDRESS | gpg --armor --symmetric --output mykey.sec.asc

The first command generates a one time password. The second encrypts the private key tied to YOUREMAILADDRESS and outputs it to the file mykey.sec.asc. When prompted to enter a passphrase, make sure you enter the password that was previously generated. You can transfer mykey.sec.asc to your phone and tell OpenKeychain to decrypt it by selecting Keys -> Import from File. Don’t text, email, etc. the file password. Manually input the password when prompted by the app!

Now all that’s left is setting up your password database in Password Store. Here are the steps:

  1. Open Password Store on mobile.
  2. Select Clone Remote Repo.
  3. In the Server section, enter your repository address and branch name.
  4. In the Authentication Mode section, select your mode of authentication. If using GitHub, select the SSH key option.
  5. Follow the prompts to generate an SSH key. Upload the public portion of the key to your GitHub account.

That’s it. You should see your password database appear in the app. When you select a password, Password Store will prompt you for your GPG key passphrase. Password Store is smart enough to show you not only passwords but any other secrets you may have hidden in the store (see Beyond Passwords)!

Conclusion

Managing dozens of passwords isn’t easy. Password managers are here to make the task more manageable (pun intended). You want your password manager to complement your workflow. pass in tandem with Password Store and OpenKeychain meets the need on Android and Linux.

read more →

ASCII Art Generator

Who doesn’t like ASCII art? If you’re like me, you probably thought about making your own ASCII art generator before but gave up on the idea thinking that it’s too complicated. Is the time investment worth it to draw ASCII versions of your favorite LOTR characters? Well, after some Googling, I found out it’s not all that bad and set to write a ASCII art CLI tool.

Project Goals

The goal is simple: write a JPEG/PNG to ASCII art generator. I came across a great Youtube tutorial by Raphson which shows how to construct the generator in Python:

Raphson’s video pointed out the key steps required to do the conversion:

  1. Load JPEG/PNG RGB pixel data into the program.
  2. Scale the image as necessary or as requested by the User.
  3. Map each pixel to an ASCII character value.
  4. Output and save character mappings to a User file.

1-4 gets you a basic generator. Raphson goes on to add features such as customizing fonts and adding color. The latter features aren’t a part of this project.

Picking an Image Library

When it comes to C++ image libraries, you have limited options:

Using the raw PNG/JPEG image libraries seemed unnecessary given two good image libraries that handle libpng/libjpeg exist. CImg was a header-only library with great documentation. However, project compilation time with CImg was astronomical. CImg compile time woes are a known issue within the community. That leaves Boost’s GIL. GIL’s not a bad option since its community is active, there’s plenty of docs, and it’s easy to integrate into a CMake project. Most importantly, GIL supports PNG/JPEG file formats and image scaling out of the box.

Mapping Pixel Data to ASCII Characters

This is the secret sauce to this whole project. The process for pixel to character conversion looks something like this:

  1. Compute the average of a given pixel’s R, G, and B value (AKA the pixel’s grayscale value).
  2. Apply a scale factor to the grayscale value.
  3. Use the integral value from (2) as the index into an array of printable ASCII chars.

The tricky part was defining the scaling factor. There are 256 possible grayscale values (0 - 255). There are N chars in the ASCII array from which to choose from when printing. Therefore, a scale factor of N / 256 made sense. Below is the function used to get the ASCII char from the grayscale value:

char AsciiGenerator::GetChar(int value) {
    static const std::string kAsciiChars =
        " .'`^\",:;Il!i><~+_-?][}{1)(|\\/"
        "tfjrxnuvczXYUJCLQ0OZmwqpdbkhao*#MW&8%B@$";
    static const float kInterval = kAsciiChars.size() / 256.f;

    return kAsciiChars[std::floor(value * kInterval)];
}

Identifying File Types

Since the generator operates only on PNG/JPEG images, it’s worthwhile to have a means of verifying that the input image is a PNG/JPEG. File extensions aren’t a valid way of identifying file formats since you could add any extension you like. Calling an external program to query for file info also seemed like overkill.

Unix’s file manpage provided useful notes. Turns out PNG/JPEG images each include header info in the first few bytes of the file. PNG’s start with an 8-byte signature of 0x89504E470D0A1A0A. All JPEGs start with a 2-byte signature of 0xFFD8. That’s all the information needed to detect the file format:

AsciiGenerator::ImageType AsciiGenerator::GetImageType(
    const std::string& filename) const {
    static const uint64_t kPngSignature = 0x89504E470D0A1A0A;
    static const uint64_t kJpgSignature = 0xFFD8000000000000;

    /* Read the first 8 bytes of the file. */
    std::ifstream ifs(filename, std::ifstream::binary);
    if (!ifs.is_open()) {
        return ImageType::kUnknown;
    }
    std::vector<char> buffer(8, 0);
    ifs.read(&buffer[0], buffer.size());

    /* Construct an unsigned 64-bit word using the 8 bytes in buffer. */
    uint64_t word = 0;
    for (const char& c : buffer) {
        word = (word << 8) | static_cast<uint8_t>(c);
    }

    /* Check if the word matches a known image file type signature. */
    if (word == kPngSignature) {
        return ImageType::kPng;
    } else if ((word & kJpgSignature) == kJpgSignature) {
        return ImageType::kJpg;
    }
    return ImageType::kUnknown;
}

Conclusion

The end result is a utility called asciigen which performs the ASCII art generation task. Unsurprisingly, SLOC count exceeded the ~45 lines of code used in the Python tutorial. The project took about a day to complete from start to finish. Even more surprising was how simple it was to get such a satisfying result (sweet ASCII images) with just a handful of insights and a number of open source libraries.

Note, this project has since been rewritten in Rust and renamed aart. The complete source is available on GitHub under aart. The Rust version of the project includes more testing but is otherwise a straight port of the C++.

read more →

Containerizing Runescape

If you grew up gaming in the 00’s and even into the 10’s, you probably have heard of Runescape. Even in 2023, Runescape remains one of the world’s most popular MMOs. The game has evolved significantly over the past 20-ish years of its existence and continues to have one of the most active online communities of any MMO.

There’s two main forks of the game: Old School Runescape (OSRS) and Runescape 3 (RS3). Both versions of Runescape have game clients. There’s a Java based, free, and open source client called RuneLite for OSRS. Runescape 3 has the C++ NXT Client. I like to play both versions of the game on a Fedora box. It would be nice not to have to install a plethora of dependencies to support either client (one of which is only officially supported on Debian based distributions).

Project Goals

Recent experiences with Docker suggested that containerizing the game clients would be a worthy endeavor. A couple of questions came up during a brainstorming session:

  1. How do you write a Dockerfile for each client that ensures you get an image with all the needed dependencies and launch scripts?
  2. Both games generate re-usable caches of game data. How do you get cache persistence between container runs?
  3. How do you make a GUI work with Docker?
  4. How do you get audio? You can’t play OSRS without those sweet tunes.

Dockerfile Setup

Both Dockerfiles build off an Ubuntu base image. In the case of RuneLite, the host distro doesn’t matter much since the client runs in the JVM. However, the NXT C++ client only has official support on Debian based distros with most Linux users happy running the client on Ubuntu machines.

Aside from installing the required client dependencies, both images create a local runescape user. The runescape user belongs to the audio group. Making a user part of the audio group isn’t recommended on desktop Ubuntu. That said, it’s necessary to get audio working along with the steps in Audio Setup.

Cache Persistence

This issue was actually easy to tackle. Docker has support for what it calls volumes. With a Docker volume you mount a folder on the host filesystem to the container filesystem. When the container shutdowns, any data written to the volume by the container will persist. Volumes fit the use case well. A per client container launch script includes a *_CACHE variable that makes the cache name and location customizable.

On Docker Containers and GUIs

Running a GUI from a Docker container is a pain in the ass. That said, there’s plenty of docs you can slog through to piece together a solution. The display server technology matters here. There are two mainstream Linux display server implementations out there: X11 and Wayland. Most distros stick with X11. The scripts developed for this project target compatibility with X11.

Here’s a summary of the steps required to get a GUI running in a container to display on the host system running an X11 server:

  • Verify the container has xorg-server installed.
  • Share the host X11 server socket with the container.
  • Generate and share a .Xauthority file with the container.
  • Set the container’s DISPLAY environment variable to match the DISPLAY value on the host system.

Below is a snippet from the launch.sh file used to launch a RuneLite client container:

# Credit to this SO post that shows a method for generating an Xauthority file on the fly.
# https://stackoverflow.com/questions/16296753/can-you-run-gui-applications-in-a-linux-docker-container/25280523#25280523
XSOCK="/tmp/.X11-unix"
XAUTH="/tmp/.docker.xauth"
touch ${XAUTH}
xauth nlist $DISPLAY | sed -e 's/^..../ffff/' | xauth -f $XAUTH nmerge -

docker run --rm \
    -v ${XSOCK}:${XSOCK} \
    -v ${XAUTH}:${XAUTH} \
    -e XAUTHORITY=${XAUTH} \
    -e DISPLAY=${DISPLAY} \
    ...

Audio Setup

Luckily, there is a great article explaining container to host audio pass through. Similar to the X11 versus Wayland display server discussion, there are different audio servers in Linux. PulseAudio seems to be the defacto audio server with PipeWire the other contender of note.

There are two ingredients to get the container to host audio working:

  • Verify the container has a PulseAudio server installed.
  • Expose the PulseAudio socket on the host to the container.

Below is a snippet of the RuneLite client launch script with the relevant bits left in:

docker run --rm \
    -e PULSE_SERVER=unix:/run/user/${EUID}/pulse/native \
    -v /run/user/${EUID}/pulse/native:/run/user/${EUID}/pulse/native \
    ...

RuneLite Gremlins

Goblins!

No project is free of gremlins. While the RS3 container was working as expected, the RuneLite client would load and then cut out before the login screen! Turns out that the RuneLite.jar that’s executed on container launch goes through a two step process. The first step spawns a process with a GUI where it shows client update downloads. That process is then killed and a second process spawns which brings up the GUI for the client itself. The killing of the first process causes the container to shutdown because docker believes the containerized process has completed its run. The second process won’t even get a chance to run.

The following hack resolved the issue:

# Run RuneLite.
java -jar /usr/local/bin/RuneLite.jar

# Give RuneLite a few seconds to boot up.
sleep 20

# Find the PID of RuneLite client process.
RUNELITE_PID=$(pidof java)

# Wait until the User exits the RuneLite client session.
tail --pid=$RUNELITE_PID -f /dev/null

When the docker container launches, it will run this script. What happens is that the first line will spawn the process which downloads updates. When the first process terminates, within a few seconds (I give myself a big 20sec buffer), the second client process will spawn. The second processes’ PID gets captured. The tail command causes the script to wait until the RuneLite PID is no more (that is, the client has exited). It’s ugly but it works.

Conclusion

Containerizing RS3 and OSRS turned out to be possible with some effort. Getting the GUI and audio working posed the largest challenge. The bright side is that the information provided here is useful in many other containerization contexts. Performance on an admittedly dated laptop has been good with no noticeable overhead to running inside the container versus on the host. Time to finally play the game.

The complete source with build instructions, usage, etc. is available on GitHub under containerized_runescape.

read more →

Docker Assisted Driver Dev and LDD3

Where does a newbie start their journey into the Linux kernel? Device drivers is the most common answer. Despite its age, Linux Device Drivers 3rd Edition (LDD3) remains one of the best options for learning about device drivers. There are challenges in using such an old text. LDD3’s code examples target the 2.6.10 kernel. At the time of this writing, the kernel is at version 5.19! That said, fixing API deltas just adds to the fun. This article talks about setting up an environment for LDD3 experimentation and the LDD3 experience itself.

Containerizing the Kernel Dev Environment

Step one, you need a kernel development environment. When it comes to setting up a Linux kernel dev environment, you get a couple of options:

  1. Develop and test the dev kernel on a single dev machine (can be risky).
  2. Develop on a dev machine and test the dev kernel on some target hardware.
  3. Develop on a dev machine and test the dev kernel within an emulator such as QEMU.

For LDD3 development, option #3 is the best choice. This project adds the twist of containerizing the toolchain using Docker. Containerization has the added advantage of allowing you to reliably replicate and share your build environment.

What does the containerization of the initramfs and kernel build process look like? You can split the task into three separate images:

  • A common base image.
  • A kernel build image.
  • A initramfs build image.

Each image feeds into the next with the result being a kernel bzImage and initramfs initramfs-busybox-x86.cpio.gz archive that work directly with QEMU.

A Common Base Image

There is a lot of overlap in the tools required to build the initramfs and the kernel. A common image built off the latest Debian slim release acts as a base for the other images. The common image also includes ccache which helps reduce kernel build times significantly.

The Kernel Build Image

The kernel build Dockerfile is straightforward. The magic happens in the kbuild.sh script (shown below) which executes whenever a kernel build container launches. kbuild.sh carries out the following three tasks:

  1. Prompt the User to configure their kernel
  2. Build the kernel
  3. Build the LDD3 modules
#!/bin/bash

# kbuild.sh runs the series of command needed to configure and build the kernel
# and any custom drivers in MODULE_SRC_DIR.

ConfigKernel()
{
    pushd $KERNEL_SRC_DIR
        make O=$KERNEL_OBJ_DIR x86_64_defconfig &&\
        make O=$KERNEL_OBJ_DIR kvm_guest.config &&\
        make O=$KERNEL_OBJ_DIR nconfig
    popd
}

BuildKernel()
{
    pushd $KERNEL_SRC_DIR
        make O=$KERNEL_OBJ_DIR -j$(nproc)
    popd
}

BuildModules()
{
    pushd $MODULE_SRC_DIR
        make O=$KERNEL_OBJ_DIR -j$(nproc) all
    popd
}

Main()
{
    read -p "Build kernel? [y/n] " -n 1 -r
    echo
    if [[ $REPLY =~ ^[Yy]$ ]]
    then
        if [ ! -f "${KERNEL_OBJ_DIR}/.config" ]
        then
            # Missing kernel config, create one.
            ConfigKernel
        else
            # A .config already exists. Prompt the User in case they want to
            # create a new config with this build.
            read -p "Do you want to generate a new kernel .config? [y/n] " -n 1 -r
            echo
            if [[ $REPLY =~ ^[Yy]$ ]]
            then
                ConfigKernel
            fi
        fi
        BuildKernel
    fi

    read -p "Build modules (assumes existing kernel build)? [y/n] " -n 1 -r
    echo
    if [[ $REPLY =~ ^[Yy]$ ]]
    then
        BuildModules
    fi
}

Main

You might notice there are a lot of environment variables. Where are they defined? The environment variables are arguments to the container. The variables each point to binary or source directories on the host system. Those binary/source directories are also mounted as volumes in the container. You want to keep those binary directories on the host otherwise you’d be building the kernel and modules from scratch every time!

The initramfs Build Image

QEMU a requires an initramfs with a basic userland. Creating the initramfs breaks down into a five step process:

  1. Generate basic userland utilities using a tool like busybox.
  2. Create the skeleton of the rootfs.
  3. Copy over your utilities from (1) into (2).
  4. Copy over the init script and custom module kobjects into (2).
  5. Use cpio to package the filesystem up.

The initramfs Dockerfile implements the steps. The output of running the initramfs container is a initramfs-busybox-x86.cpio.gz.

Custom Kernel Modules In QEMU

With the bzImage and initramfs archive in hand, you are ready to boot the kernel. The run.sh script shows the QEMU incantation needed to boot the system and get dropped into a terminal at the root:

qemu-system-x86_64 \
    -kernel "${LDD3_BIN_DIR}/bzImage" \
    -initrd "${LDD3_BIN_DIR}/initramfs-busybox-x86.cpio.gz" \
    -nographic \
    -append "console=ttyS0,115200" \
    -enable-kvm

All LDD3 module kobjects are under the /modules directory. Load/unload scripts exist for most modules. You won’t have any issues following along with the book when fiddling with the /proc filesystem or viewing kernel log messages through dmesg.

With the ability to build modules and test them out in the emulator, you are ready to dive into LDD3.

The LDD3 Experience

LDD3 is a pleasant read given the subject matter. You’ll get the most out of this book if you come in with a solid grasp of the C programming language. Moderate knowledge of Linux development and good operating systems fundamentals are critical.

A strong selling point of this book is that you don’t need actual hardware to follow along. Throughout the book, you develop different types of Simple Character Utility for Loading Localities (scull) device drivers. The scull drivers manage an in memory device which removes the need for any specific hardware. Each scull version illustrates a new driver programming concept.

One of the fun parts of working through LDD3 was resolving issues in the example code. The examples run without modification on the 2.6.10 kernel. This project targets a more recent kernel release: 5.19. The choice of using a more modern kernel breaks a few of the drivers. This forces you to navigate the kernel source code and the LWN archives in search of answers which often times leads to interesting threads regarding kernel design decisions.

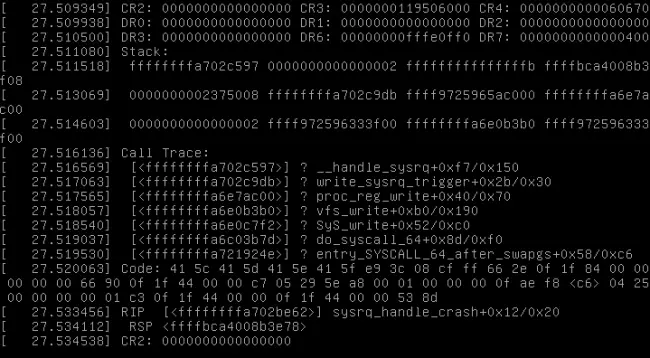
Among the many demystifying chapters in this book, Chapter 4 stands out: Debugging Techniques. As the title suggests, the authors walk you through a number of driver debug techniques ranging from looking at system log messages to firing up a kernel debugger. They even talk about how to decode the dreaded kernel oops messages:

Kernel Oops

The ability to debug kernel code using a tool like GDB just as you would a userland program feels like magic. The project includes support for debugging the kernel and modules using GDB. Given a kernel built with the right debug configurations, you can attach a GDB session to the QEMU VM and break, step, etc. through driver/kernel code! It isn’t absolutely necessary for working through LDD3. That said, the debugger did come in handy on a few occasions making it worth the effort to learn how to set it up.

Conclusion

LDD3 still holds up in 2022. Sure the example code needs some tweaking and a couple of the later chapters may be a bit dated. That said, the core concepts of the book remain relevant. Containerizing the kernel toolchain is a fun task. Not having to buy any specialty hardware to follow along with the examples in the text is a big bonus. Highly recommend LDD3 in 2022!

The complete project source with build instructions, usage, etc. is available on GitHub under linux_device_drivers.

read more →

Cosmo: A Hobby x86 OS

At the beginning of 2022, I set a personal goal to implement a bare bones OS. The first step was to define what success would look like for the project. The goal is to create an OS that could allocate a single process that adds two numbers and prints the result to the screen. It took a month long journey into the world of x86 emulators, NASM assembly, and architecture reference manuals to get remotely close.

Getting the Right Resources

Little Book About OS Development

It’s difficult to get started without the right references and resources. The OSDev wiki is one of those gems. The OSDev wiki audience is in large part hobbyist like myself looking to get started with their own OS. A number of the articles give step-by-steps, example ASM/C code, and, perhaps most importantly, links to other reference material. That said, more structure and hand holding than what OSDev provides can be useful when starting out.

The “Little Book About OS Development” (LBAOD) is yet another treasure. LBAOD is an online book written by two Graduate students at the Royal Institute of Technology, Stockholm. The book details the authors’ 6 week journey in developing a basic x86 OS. The benefit of the book was that they provide an outline to implementing various features of the OS along with links to resources for the topic at hand.

Wikis and guides in hand, it’s time to begin the journey.

Setting Up the Toolchain

Step number one, get the toolchain stood up. This project targets the x86 platform. You build many of the cross compilation tools from source since various tools require specific compile time flags.

Containerizing the toolchain is a worthwhile endeavor. Included in the container image is an x86 emulator. The key idea here is that you launch a dev container with the OS source code on the host system mounted as a volume. From within the container, you call the build/run scripts all the while editing the source code using your IDE on the host.

The Dockerfile produces an image with the necessary toolchain and emulator. Even with make’s multiple job support, the image takes upwards of 30 minutes to build on a 4 core Intel i5! Downloading a prebuilt image from DockerHub saves some time.

The script below shows how to launch the dev container:

#!/bin/bash

# Source the project configuration.
source config.sh

# Use the latest cosmo development container.
COSMO_IMAGE="iguerra130154/cosmo:latest"

XSOCK="/tmp/.X11-unix"
XAUTH="/tmp/.docker.xauth"
touch ${XAUTH}
xauth nlist $DISPLAY | sed -e 's/^..../ffff/' | xauth -f $XAUTH nmerge -

docker run --rm -it                      \
    -v ${XSOCK}:${XSOCK}                 \
    -v ${XAUTH}:${XAUTH}                 \
    -e XAUTHORITY=${XAUTH}               \
    -e DISPLAY=${DISPLAY}                \
    -u $(id -u ${USER}):$(id -g ${USER}) \
    -v "${COSMO_PROJECT_PATH}":/cosmo    \
    ${COSMO_IMAGE}

There’s a number of X11 related volumes that get mounted. The volumes enable the emulator GUI to appear on the host desktop. The user related option, -u ..., guarantees all container writes use the host system’s user permissions (that is, you don’t want all the output binaries to have user/group root).

Bochs Emulation

Bochs IA-32 Emulator

An emulator makes it convenient to test the OS. The OSDev wiki gives a nice summary table comparing the different emulators available. I decided to go with Bochs for this project for a few reasons:

  1. Simple serial logging feature
  2. Built in debug features
  3. Comes with a graphical user interface

The Bochs configuration script below loads the OS and enables logging to four virtual serial ports:

megs:            32
display_library: x
romimage:        file=/usr/share/bochs/BIOS-bochs-latest
vgaromimage:     file=/usr/share/bochs/VGABIOS-lgpl-latest
ata0-master:     type=cdrom, path=../bin/cosmo.iso, status=inserted
boot:            cdrom
clock:           sync=realtime, time0=local
cpu:             count=1, ips=1000000
com1:            enabled=1, mode=file, dev=./bochs_logs/com1.out
com2:            enabled=1, mode=file, dev=./bochs_logs/com2.out
com3:            enabled=1, mode=file, dev=./bochs_logs/com3.out
com4:            enabled=1, mode=file, dev=./bochs_logs/com4.out

For more information on bochsrc configurations, checkout the Bochs User Manual.

Choosing an Assembly and Programming Language

NASM Assembly and C++ are the programming languages of choice.

When it came time to choosing an assembly language, there looked to be two front runners: NASM Assembly (NASM) and GNU Assembly (GAS). What’s the primary difference between the two? Syntax. GAS uses AT&T syntax and is hard to read. NASM on the other hand uses the more legible Intel syntax. NASM was a easy choice.

The inherent modularity of the project drives you towards C++. The object oriented features, templating, and interoperability with C made C++ a great candidate. Being able to package concepts like the frame buffer, global descriptor table, etc. into a neat little class creates more modular code.

There was no noticeable overhead to switching over to C++ beyond passing a few additional flags to the compiler:

set(CMAKE_CXX_FLAGS "${CMAKE_C_FLAGS}
        -ffreestanding
        -O2
        -Wall
        -Wextra
        -fno-exceptions
        -fno-rtti
        -fno-threadsafe-statics" CACHE INTERNAL "")

On Using CMake and Source Code Organization

Most OS tutorials assume you will being using C and writing Makefiles. Makefiles can become tedious to write. As a result, Cosmo uses CMake to generate the OS build files.

The philosophy put forward in “An Introduction to Modern CMake” is interesting and worth a read. I stuck with the project structure recommended in that article:

cosmo
├── cmake
├── docs
├── include
├── iso
├── kernel
├── res
├── scripts
└── src

Here’s a table describing what each folder contains:

FolderDescription
cmakei686 CMake toolchain file
docsDoxygen generated HTML docs
includeOS headers
isoGRUB bootloader configuration file
kernelKernel main, OS loader, and linker script
resScreenshots and other misc resources
scriptsBochs config and build, run, etc. Bash scripts
srcOS implementation files

The usual CMakeLists.txt files define the recipe for building each target. Each OS feature including libc is its own target under src/. kernel/ is where the OS ELF lives. The kernel.elf target’s CMakeLists.txt was the trickiest to get right since you need kernel loading assembly and custom linker options and scripts.

Toolchain definition is important since you want CMake to be aware of your cross compilation tools. Many articles walk through how to write a toolchain file for cross compilation. Combining the information in the toolchain tutorial along with the OSDev Bare Bones kernel guide makes writing the toolchain script a less daunting task.

Makefile generation is now as simple as calling cmake with the -DCMAKE_TOOLCHAIN_FILE option set to point to the i686-elf-gcc.cmake script!

Generating an ISO

GNU GRUB

When you run Cosmo under Bochs, it’s as if you were putting a CD with the OS ISO image in a computer. The output of the Cosmo OS build system is a kernel.elf file. That ELF file needs to get put in an ISO image along with a bootloader for the OS. Writing your own bootloader is an undertaking of its own. Cosmo uses GNU GRUB as its bootloader.

ISO generation requires the following tools:

  • grub-mkrescue: Generates the ISO from the kernel ELF and a grub.cfg configuration file.
  • xorriso: Utility required by grub-mkrescue for ISO generation.
  • GNU Mtools: Utilities to access MS-DOS disks from GNU and Unix without mounting them. Another grub-mkrescue dependency.

grub-mkrescue combined with the grub.cfg and kernel.elf create the cosmo.iso that Bochs can boot off of. generate_iso.sh gives the details. The tools and scripts are all packaged into the dev container so there’s no need to install them on the host PC.

Progress Report

Cosmo has yet to load a program that adds two numbers and outputs the sum to the console. However, it’s close. All the features leading up to Chapter 11 of the “Little Book About OS Development” exist:

FeatureCompleted
Framebuffer DriverY
Serial Port DriverY
LoggerY
Global Descriptor TableY
Interrupt Descriptor TableY
Programmable Interrupt Card DriverY
Physical Frame AllocatorY
Virtual Memory ManagerN
User Mode ProcessN

Conclusion

Writing your own OS, even a primitive one, is a daunting task. There are communities and plenty of resources out there to help get the job done. Working a project like Cosmo teaches you about toolchains, the x86 architecture, assembly, and more. Highly recommend anyone thinking about starting an OS development project dive in. Even if you don’t hit your mark, you’ll pick up some useful knowledge along the way. Just be wary that an OS project takes patience and time!

The complete project source with build instructions, usage, etc. is available on GitHub under cosmo.

read more →

About Me

This blog began in 2022. The posts are all technology and programming related. This site serves as a personal archive of projects and topics future me may want to reference. All the code that’s posted (including the source for this site) is available on GitHub.


Contact